
Wednesday, January 18, 2012
Plumbing Plan Support Document
1. We leaned about plumbing of our structures yesterday. Today, we printed off a picture of our floor plan and inserted hot, cold, and drain pipes for our house. We used different colors to signify the different pipes and used a key to label them.
 3. As we keep on moving forward with the project, our objectives keep getting more detailed. I still think it would have been better to do all the site plan objectives before making the whole house, but i don't mind doing it now. I think it is really cool to not only see the work of what goes into a house, but get to understand it and do it ourselves. Im glad we get to do this.
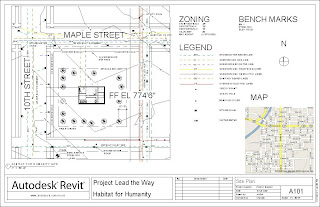
Tuesday, January 17, 2012
Site Plan
1. We used our site plan and inserted a driveway, sidewalk, landscape, and water lines. We got to see how the water system is layed out on a site plan. We learned that our building abilities are limited by our foundation limitation line.
 3. As we continue with our project, we go more into detail with the procedure. I think it would have been nice to get this out of the way before making the whole house. I would have prefered to end the project by completing the house. However, i think it is good to learn about site plans and water systems

Friday, January 6, 2012
Support Drawings
Once we finished making our houses on revit, we sarted to learn about electricity. We printed out our bare floor plan to draw on our electrical plan using outlets, switches and bulbs. Once that was done, we inserted an electrical panel and box onto our houses and I inserted skylights to improve daylighting.


 Electrical Box is in lower left


 Electrical Box is in lower left
 I enjoyed learning about electricity and lighting in a house. I feel like i understand it alot better now. It was cool to go back to our revit drawings and change and insert things to make our house more effective and improved daylighting by using skylights. I think this project has been really fun so far and i can't wait to completely finish my house.

Tuesday, December 20, 2011
Affordable house- Floor Plans
1. We spent a few classes sketching and designing out floor plans for our houses. First we would use bubbles to get the general location of our rooms. Once we made the bubble sketch we would move on to making a 2D realistic sketch of our house. Once we completed 2 drawings, we would demension them to make sure we stayed within the Affordable House restrictions. Once complete, our client picked their favorite of the two and we started using revit.


 4. REFLECTION: I think sketching our houses was very helpful. The bubble drawings helped to make sure we knew where we wanted each room to be. Once I found out the general design of my house it was easy to add other components such as hallways and doorways.


Thursday, December 15, 2011
Affordable House-Revit Drawings
1. In this project we designed an Affordable House and drew it in revit. We got to design everything and insert appliences. We got a lot more experience with revit and building a house was very cool. We did everything from dimensions to insulation and every llittle detail counted.\


 3. I think this project was very interesting. I enjoyed working on revit alot and now i feel comfortable on it. It felt good to acomplish a project this important and I know more now. The hardest part was probably getting enough room for all the required appliences and making my client happy, but overall the project was fun and educational.


Friday, October 28, 2011
Shed Activity-Revit
1. In this project we got to create a shed in the computor progam-Revit. We started from the very begining creating the floor justs to the finished shed. It was very fun to lern how to use the new program and see how advanced it is.
 3. I learned that revit is a very cool program and is fun to use and design on. I also learned that it must take a lot of work to build even a simple, two-roomed shed.
I think it was challenging to have to figure out how to use revit because it is new to me.
Desiging a shed is revelent to me because in this class we are learning about this topic. I might like to build a shed with my uncle and after this project i know alot more about the topic.

I think it was challenging to have to figure out how to use revit because it is new to me.
Desiging a shed is revelent to me because in this class we are learning about this topic. I might like to build a shed with my uncle and after this project i know alot more about the topic.
Monday, October 17, 2011
Roof Project
1. In this project, we worked in a group to build a model of a roof style. We did the style of Gable.

4. I learned a lot about the different layers in a roof to make it durable.
I liked the freedom we had in our models.
I disliked the hot glue because i burned myself about 20 times
Next time i would be more careful with the hot glue and make sure we had enough popsicle sticks (we ran low)
Gable Roof System
Colin Ritter, Dan Sullivan, Matt Scattergood, Blake Otterlei
Gable Roof structures are the simplest of the all the types of roofs. They are just two flat slopes jointing together at the ridge, which gives it a triangular appearance.
Some advantages of Gable roof structures are it is economically affordable; water easily flows off the roof, and they can withhold heavy snow fall. A disadvantage is they are one of the worst roof designs for hurricanes because the roof can easily peel off from the wind.
Gable roofs are found in mountainous locations, higher altitude locations, and other areas that have heavy snowfall. Gable roofs are also found in low income areas where price is a factor.
4. I learned a lot about the different layers in a roof to make it durable.
I liked the freedom we had in our models.
I disliked the hot glue because i burned myself about 20 times
Next time i would be more careful with the hot glue and make sure we had enough popsicle sticks (we ran low)
Subscribe to:
Posts (Atom)